Displaying full Apache status in CWP

In this guide i am going to explain how to create a new module in CWP

The meny item under plugins are added in the file located at /usr/local/cwpsrv/htdocs/resources/admin/include/3rdparty.php it holds the actual text displayed under plugins.

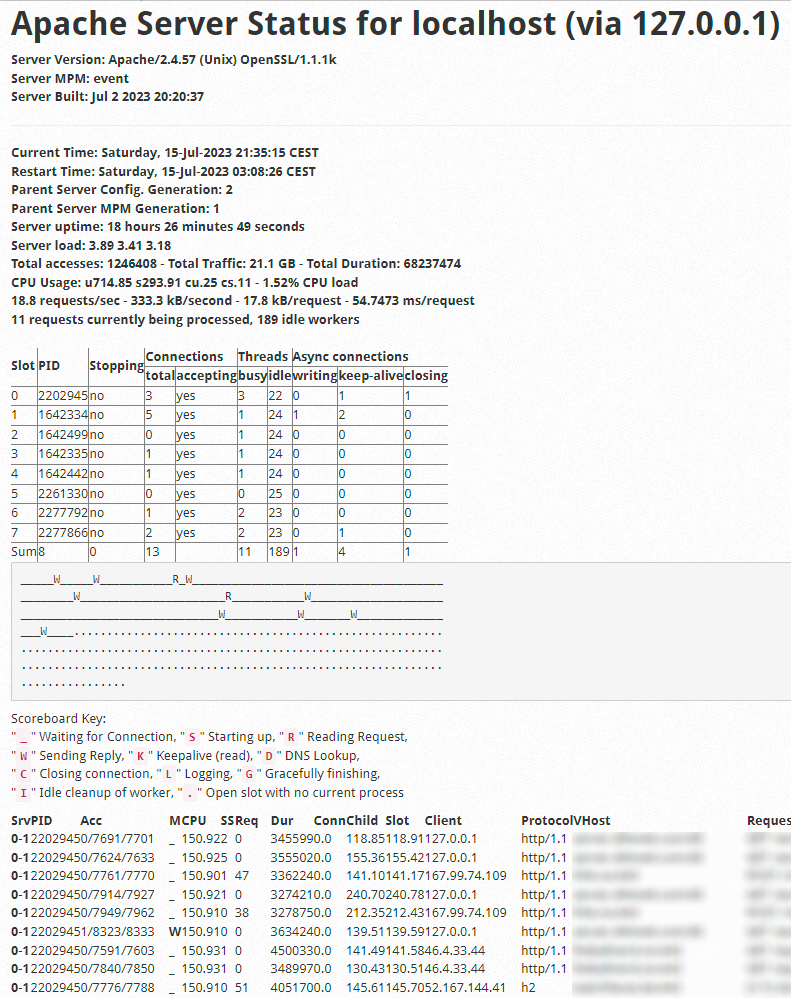
In this guilde we are going to make a module for the full apache status. CWP only display partial apache status under the Webserver Settings -> Apache Status page.

We need to add the following code to the 3rdparty.php file

After we have added the menu item its time to add the files needed to run the functions for getting the bandwidth statistics. In the code above it uses «?module=apache_status» as the plugin name/url.
You have to go to /usr/local/cwpsrv/htdocs/resources/admin/modules and add the file apache_status.php in that folder. The content i chose to use in that file are the following code.

<noscript>
<li class="custom-menu"> <!-- this class "custom-menu" was added so you can remove the Developer Menu easily if you want -->
        <a href="index.php?module=apache_status"><span class="icon16 icomoon-icon-arrow-right-3"></span>Apache Status</a>
</li>
</noscript>
<script type="text/javascript">
        $(document).ready(function() {
                var newButtons = ''
                +' <li>'
                +' <a href="?module=apache_status"><span aria-hidden="true" class="icon16 icomoon-icon-arrow-right-3"></span>Apache Status</span></a>'
                +'</li>';
                $("ul#mn-15-sub").prepend(newButtons);
        });
</script>

That will add the Menu item under plugins. Now we need to create the functions to get the apache status from the server. We are using the server-status module in Apache to do that.

After that is installed open nano and the file apache_status.php. You could also open FTP to edit these files.

nano /usr/local/cwpsrv/htdocs/resources/admin/modules/apache_status.php

Add this content to the file

<?php
// Apache Status - Accesses v0.3

$url = "http://localhost/server-status";
$ch_session = curl_init();
curl_setopt($ch_session, CURLOPT_RETURNTRANSFER, 1);
curl_setopt($ch_session, CURLOPT_URL, $url);
$result_url = curl_exec($ch_session);
echo $result_url;
?>

Now open the CWP Admin and it will look something like this:

That all you have to do. Follow me to get more update and functions like this.


6 nyttige WordPress tips

For noen av disse tipsene må du logge inn i phpMyAdmin og velge din WordPress database. Klikk på SQL knappen for å åpne SQL kommando vinduet. Lim inn koden under. Andre tips er PHP koder som blir brukt i tema filene dine.

  1. Resette admin passordet i WordPress. Bytt ut `admin` med ditt brukernavn.
    [php]UPDATE `wp_users` SET `user_pass` = MD5(‘PASSWORD’) WHERE `wp_users`.`user_login` =`admin` LIMIT 1;[/php]
  2. Endre epostadresse på folk som har kommentert, feks hvis du har endret epost.
    [php]UPDATE `wp_comments` SET `comment_author_email` = REPLACE( comment_author_email, ‘old-email@address.com’, ‘new-email@address.com’ );[/php]
  3. For dette tipset trenger du ikke å logge inn i phpMyAdmin. Her åpner du footer.php filen i ditt tema (template) og legger denne koden inn en passende plass. Denne viser antall spørringer fra databasen. Veldig nyttig for å redusere antall spørringer fra databasen.
    [php]<?php if (is_user_logged_in()) { ?>
    <?php echo get_num_queries(); ?> queries in < ?php timer_stop(1); ?> seconds.
    <?php } ?>[/php]
  4. For å legge til en «Endre/Edit» knapp i WordPress kan du bruke denne koden [php]<?php edit_post_link(__("**Edit**"), »); ?>[/php] vil du ha samme lenken på dine kommentarer bruker du denne koden [php]<?php edit_comment_link(__("**Edit**"), »); ?>[/php]
  5. Vil du vise dine tagger under postene bruker du denne koden [php]<?php the_tags(); ?>[/php] eller denne koden hvis du vil styre hvor stor skrift de skal ha.[php]<?php wp_tag_cloud(‘smallest=8&amp;largest=36’); ?>[/php]
  6. For å få en lenke til den som legger igjen en kommentar åpner du comments.php og leter etter [php]<?php the_author() ?>[/php] dette erstatter du med dette [php]<?php the_author_link(); ?>[/php]

Håper disse tipsene kan hjelpe.


6 nyttige WordPress tips

For noen av disse tipsene må du logge inn i phpMyAdmin og velge din WordPress database. Klikk på SQL knappen for å åpne SQL kommando vinduet. Lim inn koden under. Andre tips er PHP koder som blir brukt i tema filene dine.

  1. Resette admin passordet i wordpress. Bytt ut `admin` med ditt brukernavn.
    UPDATE `wp_users` SET `user_pass` = MD5('PASSWORD') WHERE `wp_users`.`user_login` =`admin` LIMIT 1;
  2. Endre epostadresse på folk som har kommentert, feks hvis du har endret epost.
    UPDATE `wp_comments` SET `comment_author_email` = REPLACE( comment_author_email, 'old-email@address.com', 'new-email@address.com' );
  3. For dette tipset trenger du ikke å logge inn i phpMyAdmin. Her åpner du footer.php filen i ditt tema (template) og legger denne koden inn en passende plass. Denne viser antall spørringer fra databasen. Veldig nyttig for å redusere antall spørringer fra databasen.
    <?php if (is_user_logged_in()) { ?>
    <?php echo get_num_queries(); ?> queries in < ?php timer_stop(1); ?> seconds.
    <?php } ?>
  4. For å legge til en «Endre/Edit» knapp i wordpress kan du bruke denne koden <?php edit_post_link(__("**Edit**"), ''); ?> vil du ha samme lenken på dine kommentarer bruker du denne koden <?php edit_comment_link(__("**Edit**"), ''); ?>
  5. Vil du vise dine tagger under postene bruker du denne koden <?php the_tags(); ?> eller denne koden hvis du vil styre hvor stor skrift de skal ha.<?php wp_tag_cloud('smallest=8&largest=36'); ?>
  6. For å få en lenke til den som legger igjen en kommentar åpner du comments.php og leter etter <?php the_author() ?> dette erstatter du med dette <?php the_author_link(); ?>

Håper disse tipsene kan hjelpe.